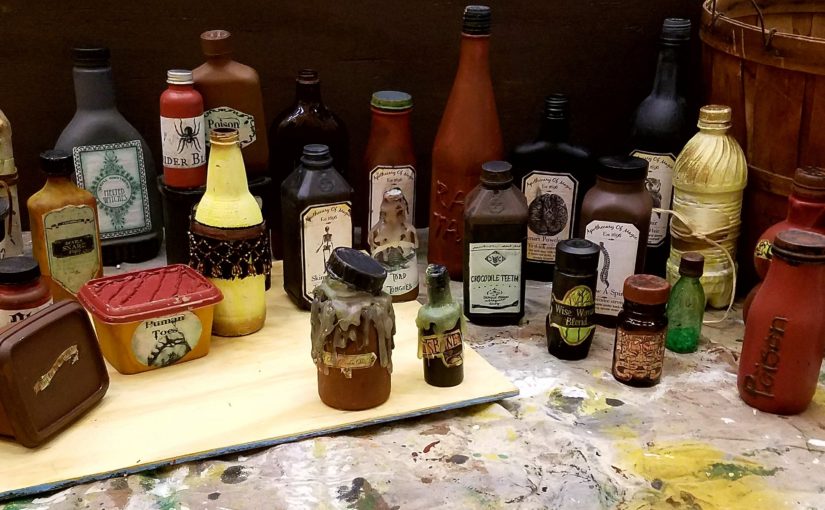
Apothecary Jar Props for Shows or a Haunted House
There have been a few times when I’ve needed apothecary jar props for shows. For Addams Family, I needed an entire apothecary, and therefore needed to make many quickly. I also host a Haunted Theater every year, and we always find new and unique ways to incorporate these.
Supplies:
- jars & plastic bottles in a variety of sizes
- apothecary labels
- glue
- scissors
- paint (craft or latex)
- hot glue
Step 1: Preparing the Jars/Bottles
I collected bottles and jars from products as I use them up and then cleaned them and let them dry. Because I didn’t want to pull off labels or worry about people seeing that a jar was actually empty, I put a couple of coats of latex paint on the jars (waiting about 10 minutes between coats). For some, I lightly streaked or sponged another coat over the 2nd coat to give it an aged effect. I really liked the way some of the brown bottles looked without paint, though, so I soaked them in warm, soapy water to loosen and remove the label. For the lids, if it was black, I usually left it alone unless it was shiny. Otherwise, I painted them a different color than the bottle. *Hint: If you want your bottles to be shiny and don’t want to worry about your paint coming off, you could paint the inside of your bottles instead. This means you may have to deal with removing labels, though. By the way, I never had to touch up bottles through my entire run of Addams Family (including rehearsals).
Step 2: Labels
Next, you apply your labels. You can purchase a set of six Potion Bottle Sticker Labels from Amazon or you might be able to find some royalty free images online to print, cut out and attach. You could also find a blank label and hand letter or use Word or Google Docs to type what you need onto it. If you print your own, here are a couple of ways to attach them.
- I applied some of my printed images directly to the wet paint and carefully rubbed them into the paint, being sure to push the edges down also.
- For others, I attached them with glue and a small craft brush. For jars that needed a specific label, I wrote it out on the bottle with hot glue, and then went over the lettering with a different color paint.
Step 3: Details
For some, I added leather string around the bottle with a small twig of artificial greenery. For others, I added hot glue to the top and let it drip down like something oozing out of the jar. You could also apply twine around a lid or even put a cork in place of the lid. Et, voila, apothecary jars! 
In Conclusion
Whether you’re needing apothecary jar props for your haunted house or a show, these are quick and easy to make, not to mention affordable! Happy crafting!
Recommended products:


These props are super cool! I may want to try this for Halloween!
I think it is very ingenious and spending time like this should be very refreshing. I always feel renewed after a craft-project.
This is so cool and looks like a fun crafting project! Love this and love visiting your site 🙂
These bottles look so cool! I think I will make some with my kids. They love crafting with me and we love to decorate for Halloween!
Hello blogger, i must say you have hi quality posts here.
Keep up good work.
this could be a nice idea for small garden decoration. I think
You could use these in a garden if you sealed them with either a spray sealer or a polyurethane.